
Jump to Video
LEANWI Websites will be using the Equalize Digital Accessibility Checker plugin for WordPress as a primary means of monitoring website accessibility compliance. The basic checker scans webpages for compliance issues and shows where those issues are visually on the page and gives code references where fixes are needed.
This tutorial demonstrates the basic functions of the Accessibility Checker. As LEANWI websites are fully remediated over through the rest of 2026 and 2027 some additional features will be added to the basic plugin including reporting accessibility issues to the LEANWI team, logging accessibility changes, and reporting.
Topics in this tutorial:
Accessibility Checker Plugin
Equalize Digital is one of many non-profits and companies that create a variety of digital accessibility solutions for websites. While there are other options out there, we have chosen the (free) Equalize Digital Accessibility Checker as our standard tool for website accessibility scanning.
In addition, Brendan has developed the LEANWI Accessibility Reporting plugin which adds notes features that will allow us to track and report on compliance progress and give you a means of reporting accessibility concerns to us.
The Accessibility Checker is installed on your website as a WordPress plugin. For more background and to understand how plugins work on a website, review the Website Plugin documentation. Reminder that we request you ask us to vet any new plugins you may wish to add to your site beyond those listed in the documentation.
If you do not yet have the Accessibility Checker plugin added to your website, you can follow the steps in the Adding a New Plugin section to add and activate the plugin on your site.
It is always best to enable auto updates after installing the plugin.
When basic structural remediation is completed on your website the LEANWI Accessibility Reporting plugin will be added and additional options and features will appear in the Accessibility Checker plugin menu settings.
Using the Accessibility Checker - Backend Scan
If you primarily update your website by adding posts to a post slider or blog post carousel, you will mostly encounter the Accessibility Checker scan on the backend editor. (Learn more about the WordPress and Divi backend vs. front end (visual) editor in this tutorial.)
Here is an example of a basic post about creating accessible posts that is being scanned by the Accessibility checker. This interface should be pretty familiar to you. Below you see where you enter a title which produces a permalink, the standard text editor where you can enter text and images, and on the right side there are boxes for publishing your posts, adding a featured image, and adding your post to categories on your website.
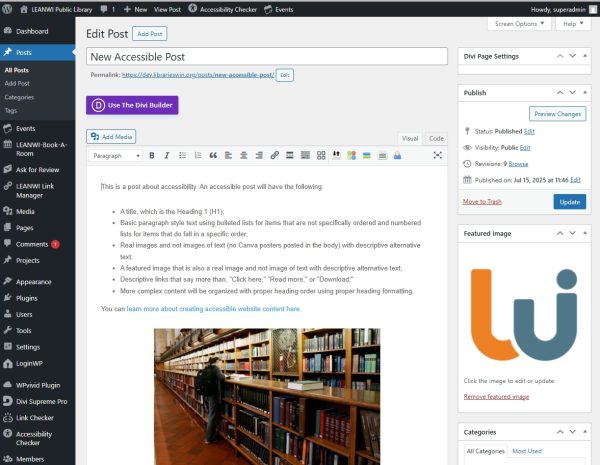
Once the Accessibility Checker plugin has been added to your site, you will see a new widget in this general space – the Accessibility Checker scanner. You will also see this space on a page editor.
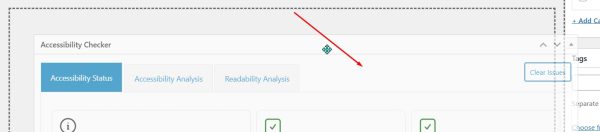
Tip: this widget, and any other widget in the editor area, can be moved to a more convenient location. To move a widget, simply click on the up/down carrots/chevron icon in the upper right corner of the widget box. You can also click and drag a widget using the top menu bar.
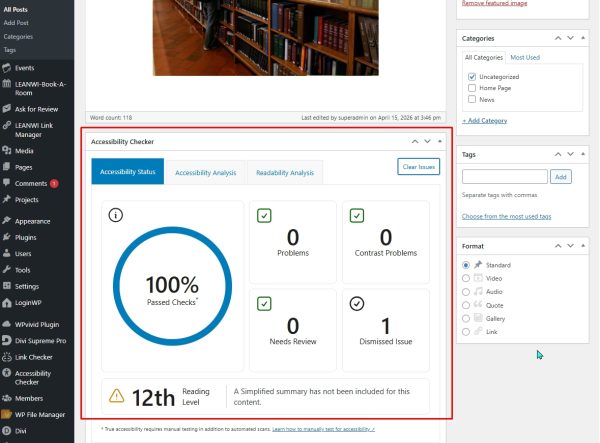
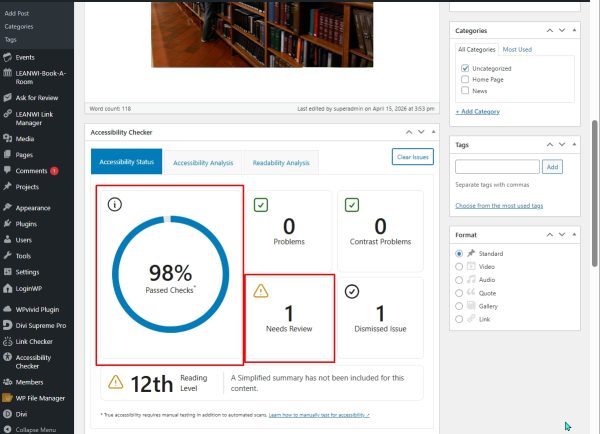
In this example, the post about accessibility has passed all of the accessibility checker scan tests. Assuming your website has had all the functional remediation finished and you have done all the things listed in the New Accessible Post post, you likely will see a 100% passed checks result.
But what if you haven’t done everything you need to do? Let’s remove the alt text from the image in the body of the post and save changes.
Now we have less than 100% and an alert indicating something needs review.
To learn more about what the “Needs Review” indicates, click on the “Accessibility Analysis” tab.
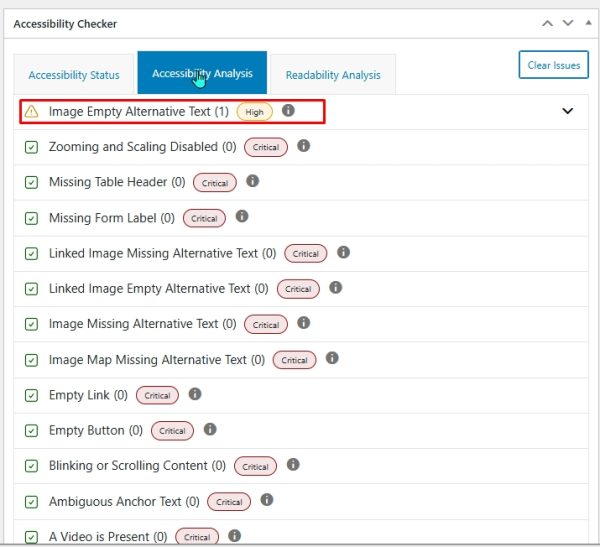
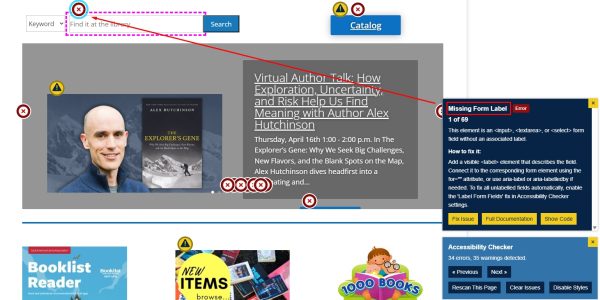
To view a specific issue, click on the chevron carrot with the error. Now you will see the specific affected code, the item (in this case, and image) or landmark, and give you a couple of actions. This one will allow us to view where the item is on the page, which is helpful if the error is vague.
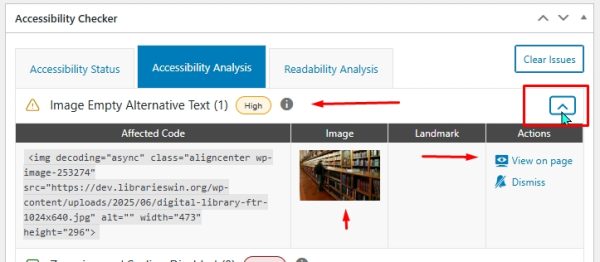
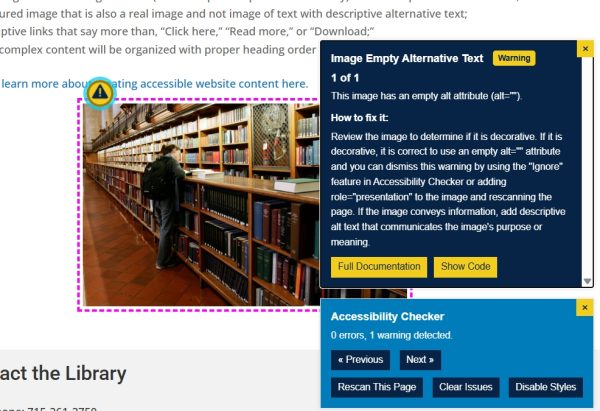
If you choose the “view on page” option, a new tab will open with the webpage, the item in question outlined, and boxes with more information on the error and how to fix it.
Accessibility Checker Front End Scan
It is also helpful to be able to scan the front end or visual builder side of a webpage. The Accessibility Checker can easily highlight and move between errors. Seeing errors in context can give better clues as to how to fix problems.
Note: scanning on the front end requires you to be logged in to your website and viewing – not editing – a page.
To begin the scan, simply click the yellow circle icon in the lower right corner of the page.
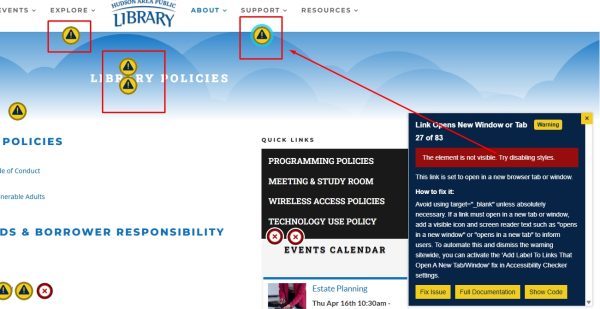
This will launch the checker. To view the errors and warnings, simply click the “Previous” and “Next” buttons. A pink or blue marker box will highlight the problem area, and this will move visually around the page as you click Previous and Next. A dark blue text box describing the error will appear above the blue checker window.
Tips and Tricks:
- If warning or error labels seem to be “floating” on the page and the checker says item is not visible, it may be indicating a problem with a menu item or with the Accessibility widget.
- If you have added alt text to an image but you get a warning that it is still missing (especially in a blurb module), let us know.
- Review the list of errors below for an idea of which errors you may be able to address and which ones need additional coding or remediation assistance.
Common Accessibility Errors (and how to fix them)
There are two broad categories of of errors that the accessibility checker will find on your site: those that you can fix and those that you likely can’t. The challenge is telling them apart, and knowing what to do about them.
This will be additionally challenging until your site has been structurally remediated and errors that appear in your, header, footer, menus, or have to do with link contrast and other WordPress defaults, etc., have been addressed.
But this is still a good time to familiarize yourself with the types of errors and the language the plugin uses to tell you about them. The following table gives some general examples. Once you have the LEANWI Accessibility Reporting plugin installed, you will have a direct method of reporting errors on your site. There are some errors, however, that a website manager is responsible for.
| Errors requiring LEANWI assistance | Errors a web manager can/should address | Errors a web manager might fix or might request help |
| iframe missing title | Empty Alternative Text | Insufficient color contrast |
| Empty button | Alternative Text too long | Incorrect heading order |
| ARIA hidden | Ambiguous alternative text | Duplicative alternative text |
| Empty link | Link opens in new tab | Linked image empty alternative text |
| Missing form label | Empty paragraph tag | Image animated GIF |
| Slider is present | Missing transcript | |
| Ambiguous anchor text |