Adding Links
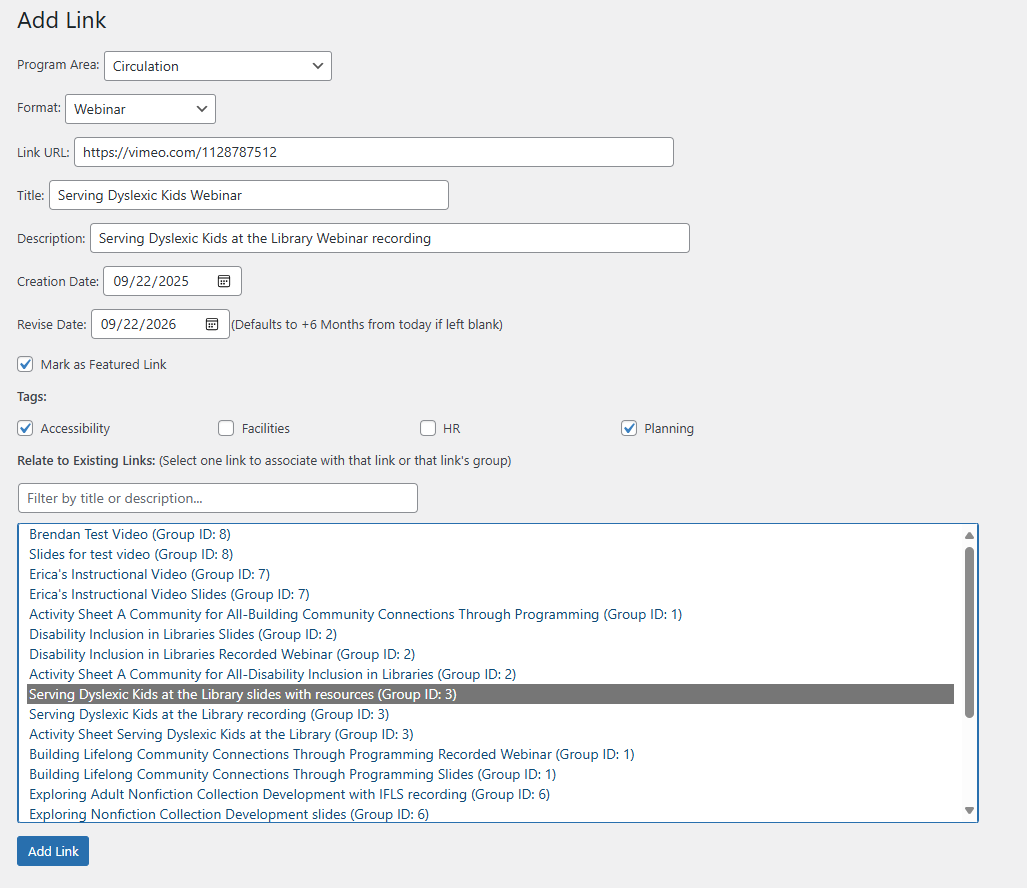
New Links may be added from the LEANWI Link Manager > Manage Links page and clicking on the ‘Add New Link’ button at the top of this page. You will see the following page:

From top to bottom fill in the respective fields as follows:
Program Area: (required) Choose a Program Area from the drop-down list. If you don’t see the Program Area you require, please contact the Link Manager Administrator to confirm what the correct Program Area should be for your use case.
Format: (required) Choose the format for the link from the drop-down list. If you don’t see the format you require, please contact the Link Manager Administrator to confirm what the correct format should be for your use case.
Link URL: (required) Enter the URL (including https://…) or SharePoint location of the link you are adding.
Title: (required) This is the title or name of the link as it will be displayed to users.
Description: (optional) You can enter a description to help users understand exactly what the link is to. It is recommended to enter this field even if it is just the title repeated.
Creation Date: (required) Defaults to today’s date if not entered but this field should denote the creation date of the related link.
Revise Date: (required) Defaults to 6 months from today’s date if not entered. This field is used to keep track of when the related link should be reviewed for relevance.
Mark as Featured Link: (optional) Use this checkbox to denote the link as a featured link so that it may automatically be displayed in featured feeds and in featured lists etc.
Tags: (optional) Tags may be a very integral part of making your resources searchable by people who are unsure what they are looking for. If you do not see a tag that you require you may want to add it yourself via the “Tags” page. If you are unsure, please contact the Link Manager Administrator to confirm what the correct tags should be for your use case.
Related Links: (optional) Links may be related, or grouped) with other links and then when one of the related links is displayed it will also show the related links. This is useful where for example where you perhaps have a link to a webinar that has related links to slides and activities perhaps. Here is an example of how you would do that:
-
-
- Create a link for the webinar link, perhaps as a ‘Featured Link’. Do not add this link to any group. Click the ‘Add Link’ button.
- Create a link for the slides. Highlight the first link above to make these two links a group. Click the ‘Add Link’ button.
- Create a link for the activity sheets. Highlight the first or second link above (it does not matter) to add this link to their existing group. Click the ‘Add Link’ button.
-
You’re Done!
Now you can either:
-
-
- Navigate back to the main Manage Links page and find your newly created link to verify it looks correct. You may want to visit the Searching and filtering links page to check out how to find your newly created link.
- Browse your website for where you think the link should have appeared and check that the new link is listing correctly
-


